Thursday, May 23, 2019

Office 365

How to merge an Office 365 account with an on-premises AD account after hybrid configuration?


Once you have completed a hybrid configuration in your company, it turns out that the job is not done yet. After a quick verification whether the hybrid is set up correctly, you notice that some of the users are not synchronized properly. And if that is the case, you need to do some additional adjustments. If you hit the roadblock during the synchronization it is most probable that the problem will be related to user synchronization between local Active Directory and Azure AD. Common causes for this are:
  • Lack of rights to Organizational Units (OU) or AD objects (users, groups or computers) for a service account used by Azure AD Connect (AAD Connect)
  • The improper scope of objects synchronized with Office 365. In other words, perhaps an OU that contains a certain user object, group or computer was not selected in the AAD Connect configuration wizard.
You can encounter these problems when you run the synchronization from on-premises AD to Office 365. But this can also happen the other way round when you run the synchronization from Office 365 to on-premises AD or in both directions. Look at the most common scenarios here:
  • A user has an Office 365 account and no local AD account
  • A user has an account in Office 365 and in local AD (this user had two accounts before the hybrid configuration was implemented to have access to services offered by Office 365);
  • A user has an account in Office 365 with an Exchange Online license assigned as well as an account in local AD with an on-premises Exchange mailbox (a single user has two separate mailboxes).
In this article, I will show you how to manage these situations in an environment with hybrid configuration and Centralized Mail Transport enabled.

A user has an account in Office 365 but not in local Active Directory
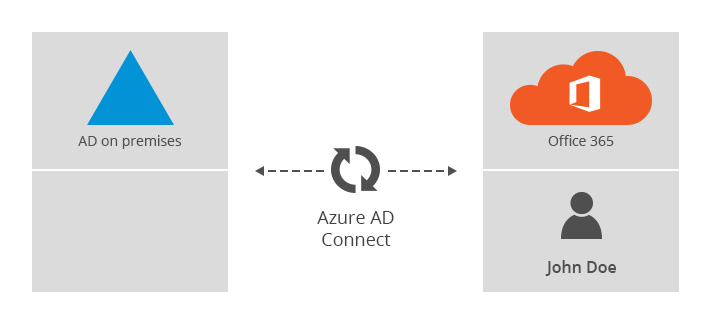
Merging AD account with Office 365
In this scenario, a user account is created in Office 365 in a hybrid setup. It is worth mentioning that this scenario is correct and supported by Microsoft. However, it causes problems for an Office 365 user when he or she wants to access public folders being on the on-premises Exchange. This means that the user will not be able to access local public folders (legacy public folders) and any attempt of connection will throw an error:
Cannot expand the folder. The set of folders cannot be opened. Network problems are preventing connection to Microsoft Exchange

How to solve this problem

To solve the problem you need to run SMTP matching. This means that you need to create a local AD object with SMTP address that matches primary SMTP address of a user object in Office 365. Unfortunately, there are some limitations highlighted by Microsoft related to SMTP matching:
  • A user account that you want to run SMTP matching on needs to have an Exchange Online email address (the Exchange Online license is not required).
  • A user account that was originally authored in Office 365 can be SMTP-matched only once.
  • During the SMTP matching process, the primary address of an Office 365 user can’t be updated.
  • Every SMTP address needs to be unique, otherwise, the synchronization will fail and you may see this error:
Unable to update this object because the following attributes associated with this object have values that may already be associated with another object in your local directory services: [ProxyAddresses SMTP:john@example.com;]. Correct or remove the duplicate values in your local directory.
To match users in Office 365 with AD users, follow the steps below:
  1. Log in to Office 365 and go to Exchange admin center.
  2. Write down the primary SMTP address for a selected user in Exchange Online (if you do not have an Exchange Online license, you can take this address from user’s Office 365 login – in most cases it’s the same).
  3. Create a user object in your local Active Directory with the same attributes (first name, last name, UPN, etc.) as they are in Office 365.
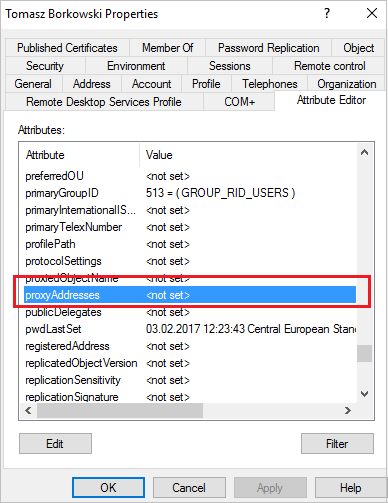
  4. Set up the primary SMTP address for a new AD object using the address from step 2. In Active Directory, look for the proxyAddresses attribute.Setting up proxyAddresses parameter
  5. Force the synchronization of AD objects with Office 365 on the server with Azure AD Connect. Use the following cmdlet:
    Start-ADSyncSyncCycle -PolicyType Delta
  6. After a successful user synchronization, you should see that the Sync type section shows Synced with Active Directory instead of In cloud.Sync type section in Office 365

Once the synchronization is finished, an Office 365 user should have access to on-premises public folders.

A user has both Office 365 and local AD accounts

Sometimes a company uses both environments to have access to different services offered by these two platforms. For example, the company decides to use Office 365 to have access to SharePoint Online and Skype for Business services. At the same time, the company maintains the on-premises Exchange Server.
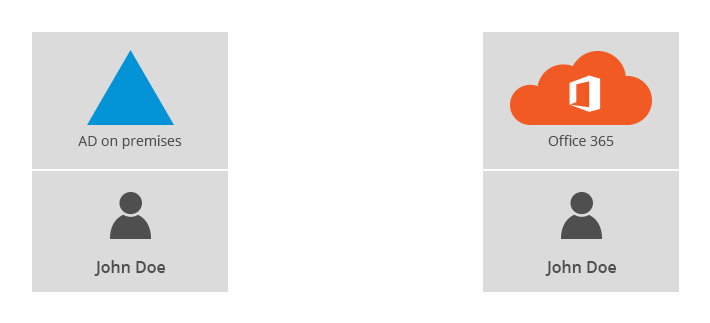
A user has both Office 365 and local AD accounts
However, when you set up a hybrid environment and synchronize directories via Azure AD Connect, this may duplicate user accounts or cause other sync issues. A single user can end up having two accounts – one in Office 365 and one in local Active Directory. If the company uses Skype for Business (Lync) in an on-premises environment, the synchronization can be even more complicated.
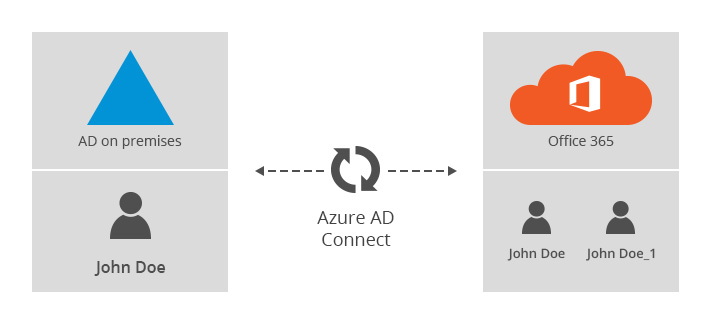
One user, two accounts
If that is the case, you should carefully plan the synchronization before using Azure AD Connect for the first time. By verifying attributes, UPNs and SMTP address, make sure that all AD objects correspond to Office 365 objects. Additionally, when you have Skype/Lync on-premises you should think over what results you expect to achieve. For example, you may decide to migrate to Skype for Business Online and stop using the on-premises solution.
Generally speaking, if any problems appear in this scenario, you can run SMTP matching as well. If there are duplicates of user accounts, you need to remove them from Office 365 using the following cmdlet in Azure Active Directory Module for Windows PowerShell:
Remove-MsolUser -UserPrincipalName j.doe@example.com

Remove-MsolUser -UserPrincipalName j.doe@example.com -RemoveFromRecycleBin

For a user who has a duplicated account, you should check and correct attributes either in Office 365 or in local AD. In Azure AD Connect, you can find more details on fixing synchronization problems.
To get more information on Skype/Lync migrations, visit this TechNet website.

A user has one mailbox in Office 365 and one in an on-premises Exchange

It is one of those weird situations when a single user has one AD account but is connected to two mailboxes – one mailbox is in Office 365 and the second one is on on-premises Exchange (practically, it will be connected to on-premises via Autodiscover). This situation is very similar to the one described in the second scenario above, with the only difference that an Office 365 user has the Office 365 license assigned (including a license for Exchange Online). As you can imagine having two mailboxes in hybrid settings causes complications in email flow for that user. When the MX record points to Office 365, an email will get stuck in Office 365 mailbox and will not be delivered to an on-premises mailbox.
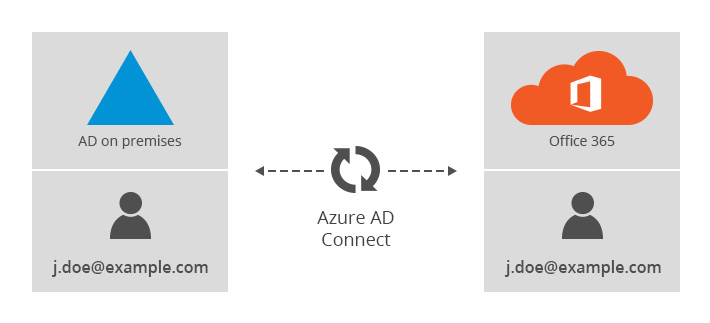
A user with one mailbox in Office 365 and one in on-premises Exchange.

How to solve the problem

Unfortunately, in this case, SMTP matching will not help. The only result you would achieve after running the SMTP matching is having Office 365 and the on-premises accounts matched – this will not merge mailboxes though. Removing a license from an Office 365 user will not solve the problem either. The only method would be to remove the Office 365 user and recreating it via Azure AD Connect synchronization.
Note: Keep in mind that when you remove the user, he or she will lose their Office 365 data. That is why before deleting the user account, make sure to create a backup copy of user’s data (OneDrive, Exchange etc.). If you need to repeat this procedure for a number of users, you may consider using a third party tool like CodeTwo Backup, which will also help you restore data to on-premises mailboxes.
To solve the problem follow the steps below:
  1. Connect to an Office 365 tenant using Azure Active Directory Module for Windows PowerShell:
    Connect-MsolService
  2. Then, remove the user by executing the following cmdlets:
    Remove-MsolUser -UserPrincipalName j.doe@example.com
    Remove-MsolUser -UserPrincipalName j.doe@example.com -RemoveFromRecycleBin
  3. Finally, recreate a user via Azure AD Connect by forcing the synchronization process (run the cmdlet on the server with Azure AD Connect):
    Start-ADSyncSyncCycle -PolicyType Delta
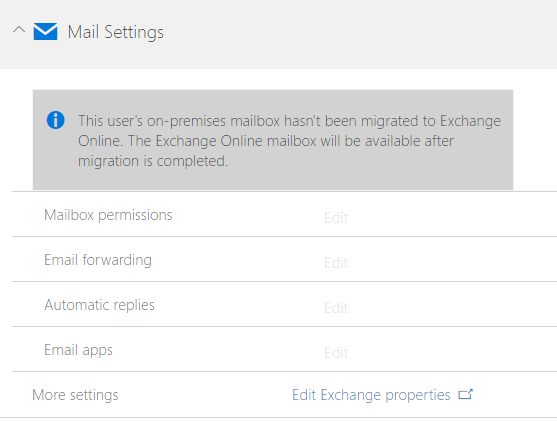
  4. As soon as you activate the Office 365 license, you should see the following information:Mail settings
This confirms that now Exchange recognizes the user’s mailbox. Once you have recreated a user, you can start restoring user’s data to Office 365.

Wednesday, October 24, 2018

Exchange 2019

Microsoft announce that final build of Exchange Server 2019 is now available and can be downloaded from the Volume Licensing Service Center.
After announcement of final built Microsoft removed the preview built from download center but if still you want to test Exchange 2019, can download from here.
Microsoft said that We strongly believe Office 365 delivers the best and most cost-effective experience to our customers, but we understand that some customers have reasons to remain on-premises. Exchange Server 2019 is designed to deliver security, performance, and improved administration and management capabilities. These are the attributes our largest on-premises customers tell us they need from Exchange. We also have features end-users will love too of course.
Here are some of key features
Security:  Exchange Server 2019 support Windows Server Desktop and Core both. As per Microsoft, Exchange Server 2019 installed on Windows Server 2019 Core provides the most secure platform for Exchange. We can install Exchange 2019 on Windows Server 2016 Core or Windows Server 2016/2019 with Desktop Experience, but Microsoft recommended to install it on Windows Server Core 2019 as per exchange code. Microsoft not mentioned anywhere that we can install it on Windows Server 2012 but in test lab i have installed it on Windows Server 2012 R2.
Performance: Microsoft designed Exchange Server  2019 to take advantage of the larger core and memory packed systems. Microsoft successfully running Exchange Server with up to 48 processor cores and 256 GB of RAM.

Exchange 2019 installation requirement
There are some of additional component which required by Exchange Server 2019. The list of components are :-
Before proceed to installation some of Server Feature Role need to install on server or Exchange Server install required feature role itself, list of Server Feature Role required by exchange 2019 are as bellow:-
  • Remote server administrative tool
  • The ‘IIS 7 Dynamic Content Compression’ component is required.
  • The ‘IIS 7 Digest Authentication’ component is required.
  • The ‘IIS 6 WMI Compatibility’ component is required.
  • The ‘Client Certificate Mapping Authentication’ component is required.
  • The ‘HTTP Redirection’ component is required.
  • The ‘Tracing’ component is required.
  • The ‘Request Monitor’ component is required.
After Installation of above all components Please reboot the machine.
Prepare Active Directory for Exchange 2019
Exchange Server Setup Prepare Active Directory for Exchange 2019 itself or we can  Prepare Active Directory for Exchange Server 2019 our-self, to  prepare active directory for Exchange Server 2019 we should be member if Active Directory Schema Admins Group.
We can Prepare Active Directory for Exchange Server 2019 by following Powershell cmd:-
Setup /PrepareAd /IAcceptExchangeServerLicenseTerms
If we are preparing Active Directory in an Existing Environment we don’t need to specify Organization Name.
Prepare Organization
You can see above that AD Preparation is completed.
If AD Preparation is done in new Environemt we can verify that from Active Direcoty User and Computer Console As well. We will see Microsoft Exchange Security Group Containor in User and Computers Console.
Prepare organization 01

Exchange 2019 Instllation
Before proceed to Exchange Server 2019 Installation Please add your account in Exchange Trusted Subsystem group.
exchange trusted subsystem
Now we can proceed to Exchange 2019 Installation.
  1.  Run Setup.exe from Installation Media.
0
2.  In First Screen you will get option to check for updates. Microsoft Recommended to check for updates.  Select Connect to the Internet and check for updates and Click Next.1
3.  Setup will Copy the required files.2
4. Once setup copied the required files we will get Exchange 2019 Introduction Window. In Introduction window we can read about exchange server and click Next.2-1
5. Now we will get License Agreement Windows where we have to accept License Agreement Terms. Select I Accept the terms in the License Agreement and Click Next.3
6.  In Next Window we need to select setting. We can use recommended settings or customize settings as per our requirement. We are going to select Use Recommended Settings  and click Next.4
7.  Next Windows is about Server Role selection. You can Select Role which you want to install. Just to let know that Microsoft removed the Unified Messaging Role from Exchange. So now we have only two roles – Mailbox Role and Edge Transport Role.5
8.  We are going to install first Exchange Server in our Organization so we have selected Mailbox Role, after Role Selection click Next.5-1
9. In Next Windows we will get information that about how much space required for Installation and Location. We can set Installation Path according our requirement and click Next.6
10.  In next windows we can set Organization Name in my case I have alredy set organization name duing prepation  of Active Directory for Exchange 2019. So i am going to click Next.7
11. Next window is about Malware Protection Settings. Malware Protection Scanning should not be disabled. Select No and Click Next. 8
12. In Next windows Exchange Setup perform the Readiness Check and verify all required components is installed or not. If anything if missing then we will get error. Once Readiness check is done click Next.9
13.  Setup Process is now begins.
If Active Directory Prepared from Powershell then there will be only 13 steps otherwise there will be 14 steps. 10
14. Now Exchange Installatio is Completed. We can launch Exchange Adminitration Center. 11

Thursday, March 15, 2018

"Unwanted" or "Junk" Folder Being Added To Outlook

I recently had an issue with Outlook, mysteriously it created a new folder name "Unwanted" and started filtering all mail into that folder instead of the Inbox. What's also strange, in the Search Folders > Unread Messages didn't reflect the same unread.

After that, I googled for this and found, Issue reported with Samsung Galaxy phones.


Samsung Galaxy phones has its own SPAM filtering built into the phone. In that SPAM filter, our *@domain.com was listed...along with a bunch of other email addresses.


**Note** This issue/fix applies to several model lines of the Samsung Galaxy

Here's what you need to do to fix it:

1. On the phone, open the E-Mail app
2. Hit the Menu Key > Settings > General Settings
3. Select Spam Addresses and look for any errant email addresses, especially*@yourdomain.com entries, which would filter any messages from your domain.
4. Remove those addresses

Now the user can move the messages out of the Unwanted Folder and delete that folder, and email will stop being filtered improperly. 


Solving the Email Signature Problem for Exchange Mailbox Users


These days, our end users use Outlook (desktop), Outlook (mobile), and Outlook (on the web, aka OWA) and other third party apps (such as such as the iOS mail) to access their email.

Each Outlook client has its own email signature settings. When a new email profile is created the signature needs to be recreated as well. The only persistent email signature is the one stored in OWA, but that signature is not utilized by other Outlook clients.

Exchange's own native capabilities to insert email signatures using mail flow rules is quite limited as described by Paul Cunningham. This problem is so common that a healthy ecosystem of third party solutions evolved over the years, with products from the likes of Exclaimer and CodeTwo filling the need.

But perhaps there is now hope for the organizations who don't have the budget for third party solutions. As Jeff Guillet writes:

In a recent discussion with the Exchange and Outlook product groups, the MVPs discussed a long-standing request – to store email signatures in the user's mailbox. Doing so will provide a centralized place to store and retrieve
the   signatures and provide consistency for the email clients that consume
them (Outlook for desktop, Outlook on the web (OWA), and the Outlook apps (iOS and Android)). We are also requesting that signatures can be managed via PowerShell.

The product groups challenged us to show that customers want this by vote count on UserVoice. Please vote for the “Store Signatures in the mailbox” idea on UserVoice website to make your voice heard. I've written a spec for this feature, which I will be submitting to the PGs once the vote count gets higher. Our expectation is that this will work for both Exchange Server and Exchange Online.

“It's heartening to see that Microsoft is open to the idea. They are obviously aware that this is something customers want. But development resources are applied to the solving the biggest problems, or working on the most in-demand features. For this particular request to get traction, it's going to take a lot of interest from the community.”

In other words, your vote is important!

So if you believe that Exchange should have better email signature capabilities, please go to UserVoice and add your vote.